
The Hacker Mindset — From Mind to Machine

A Guide to Developing the Right Mindset and Toolset to Master the Art of Cyber Intrusion.
\ Preface
This blog aims to cover things that I believe are invaluable for anyone starting their journey as a penetration tester. That being said, there is also a section in the blog that intrigues people who are looking for something zesty.
It’s deeply personal to me, as I’m sharing insights I wish someone had given me when I was starting out. From developing a problem-solving mindset to setting up your terminal for maximum efficiency, this blog is for both beginners and veterans alike. We’ll explore practical tips, common pitfalls to avoid, and strategies to accelerate your growth in this field.Whether you’re looking to sharpen your technical skills or cultivate the right mindset, I think you’re in for a real treat.
\ Penetration Testing
“Penetration testing is the art of illuminating the shadows in our digital fortresses, a deliberate journey into vulnerability to forge resilience. It’s a mirror held up to our defenses, revealing not just weaknesses, but opportunities for growth and understanding in the ever-evolving landscape of cybersecurity…”
Although that was very philosophical to read through & had a nice soothing tone, penetration testing or “pen-testing” as it is so affectionately called in the community, can get really mind numbing really fast. I am an absolute novice at this form of art; and ‘art’ it most definitely is, because it’s not only your skill set and problem-solving that will get you far, but also much more, which this blog aims to cover. So sit tight and get yourself a cup of coffee because if you think breaking into networks is tough, just wait until you see me trying to figure out the mantra to a perfect brew of medium roast americano — it’s like trying to hack into Fort Knox with a butter knife!
\ The Crash Test Dummy
Embracing Controlled Chaos

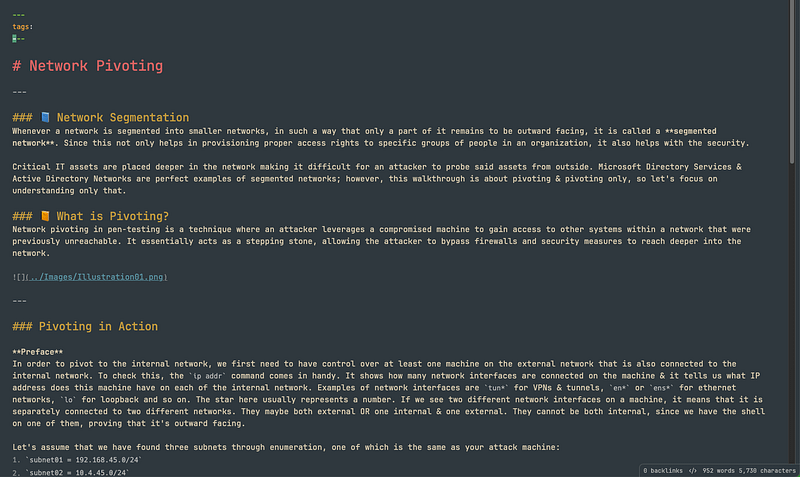
This is really for readers who are just thinking of entering this field and are just getting started. I wish someone had explained to me the importance of developing a chain of thought that runs through different permutations and combinations of how something can be broken. This is almost every pentester’s second nature — breaking things. Whenever you see something, think — ‘How can I break it?’ As a security engineer, you will come across a number of programs, scripts, binaries, and tools in general.
If you think about it, any program can be broken down into three fundamental parts. Any program always takes in data, does something with it, and then creates an output or result. As a penetration tester, you should always think about providing inputs that a program might not expect. You see a website with some ‘shopping cart’ functionality? Try providing ‘-1’ as the amount of product you want to buy and click on ‘add-to-cart’. See what happens. Some of you might think — ‘How the hell can someone add a negative 1 to the shopping cart?’.
Well I’d say that is for you to figure out. Keep breaking, keep learning and always know —
In the world of cybersecurity, if at first you don’t succeed, just call it version 1.0 and move on!
\ Organize, Organize, Organize.
There are more moving parts than you think there are.

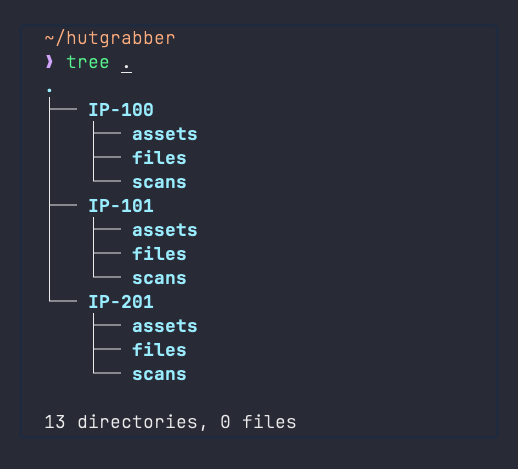
I can’t stress enough how important it is to have your own system of organization. If you don’t, I’ve got you covered. You can use the contents of this tutorial as a starting point to create your own. A good place to start is the beginning. Once you have the list of machines you are going to engage with, create directories for them based on their IP. You can get really creative with the naming schemes:
# When you know there is an internal & external network:
./EXT-192-168-45-234
./EXT-192-168-45-119
./INT-10-10-7-50
./INT-10-10-7-231

# When you know what services are running on the systems:
./MS-01-INTERNAL
./DC-01-INTERNAL
./WEB-01-EXTERNAL
./WEB-02-EXTERNAL
./MSSQL-01-INTERNAL
./CONFLUENCE-02-INTERNAL
./SPLUNK-01-MAIN-INTERNAL
./DNS-01-EXTERNAL

# When everything is on a single cloud service:
./ELB-01-US-EAST
./EC2-01-US-WEST
./EC2-02-US-WEST
./REDIS-01-MAIN-US-EAST
./S3-01-LOGS
./S3-02-IMAGE-CACHE
./S3-03-USER-STORE
The world is your oyster. Just make sure to also organize the subdirectories in a way that might make sense to the context of the engagement. If it is a CTF, you may want to follow a file structure like the own shown below, saving artifacts (credentials, pdf files, binaries, source code, hashes, etc.) that you find in their respective categories along the way.
Here’s a few tips to keep a clear mindset:
- Enumerate Well — Spend most of your time learning about machines & making notes. We will talk about note taking a little later in this blog. You want to make sure you capture every aspect of your target before making any moves. Double check your scans as well as other recon attempts. Enumerate each port multiple times in multiple ways.
- Go Step-by-Step — Do not haphazardly go about interacting with random targets and services. Create a mind-map. Set you goal. Take baby steps. Completely work on 1 target and then move on to the next. Make sure you are taking notes. If it’s on your mind, it should be in your notes.
- Understand the Outcome — Even before you start doing anything, make sure you know what you want out of the engagement. Not every engagement demands that you to run CrackMapExec, Impacket-Scripts and Metasploit and RCE your way into the system. Understand that automated tools can harm production environments; sometimes irreversibly. Sometimes you will only need to get a proof-of-concept running; other times you’ll only need to leak a few files. It’s just like a ‘show and tell’.
All in all, having a plan of action and a system of organization goes a long way. A few might agree that it’s the only correct way to pentest.
\ Getting Those Hands Dirty
Can’t learn how to swim by reading a book. Can you?
Now let’s pick up the pace and talk about pentest engagements. There are three fundamental components to this: the terminal, your notes, and your tools. In this blog, we will not only talk more about these but also work on creating an advanced pentesting setup for you so that you do not have to depend on Kali Linux for your hacking needs.
One thing you absolutely need to understand is that the smoother your workflow is, the clearer your mind is going to be. Which will help you keep your goals and outcomes in sight. No one wants to be the person who is fumbling for commands, switching from keyboard to mouse and then back to the keyboard and then back to the mouse and then suddenly you press the “X” button and your terminal closes, so you have to re-open a new session, so you type — $> history | grep -i ‘what was that command again?’
ARRRRRRRRRRRRRGGGGGGGGGGHHHHHHHHH !!!

\ Your Temple — The Terminal

I wish someone explained to me the power of bash earlier in life, but better late than never. Any type of scripting knowledge is going to prove to be a golden asset here. We are going to leverage the power of aliases, shell scripts & a few other terminal apps that will totally transform your life.
\ Pin-Pointing The Problem
Really watch yourself as you complete a few practice machines and understand your workflow. Identify the tasks that you find yourself doing again and again. This could mean different things for different people; however, I am going to focus on the things that I find myself doing redundantly. There are numerous things that I can put down here, but let’s start with six of these:
- When I start probing an IP, I find myself exporting the IP as a bash variable in that terminal session. For example, if the IP is 10.10.10.10, I use the — $> export IP=‘10.10.10.10’ — command so that I can use that variable in scans later on by calling the variable as $IP.
- If I find that a system is running a web server, I tend to add it to the /etc/hosts file on the system that I am working on so that I can call it using a domain name. This reduces web-based errors that the website might face. I also find myself fumbling to add the host to this file and then when I am done with it, I want to remove the name as well but sometimes I just forget.
- Before starting an engagement, I typically need to connect to a VPN to access the client’s infrastructure, especially when performing a penetration test remotely. This is also true when I practice on platforms like TryHackMe or Hack The Box.
- When working with the nmap scripting engine (NSE), I keep forgetting the names of nmap scripts. I have to repeatedly get into the directory where nmap stores all the scripts and hit “ls -la” to see all scripts just so I can use one.
- Like everyone else I like working in multiple terminal windows or tabs. I usually use 1 window for reconnaissance, 1 window for servers or listeners, 1 window for writing and editing exploit code and so on.
- I use a lot of different tools, some of which do not come pre-installed with Kali Linux. To keep things organized, I store all these tools in the /opt directory. The tools can be binaries, scripts or cross platform executables that help me through the pentesting engagement.
\ Designing The Solution
Alright, so this is where things can get a little more technical, but I promise if you stick through this, the linux gods will shower you with love.
First of all, get your bash on!
Many of us already know network chuck, but he is the best resource for noobs & pros alike. I really like how he dumbs down concepts through real world examples.
Just a little side-note here: all of the shell scripts shown below can be used as scripts themselves by adding them to a “script.sh” file; but you know what’s better? Create a new file in your ~/.config folder and name it “all_scripts.sh”. Add whatever you want to this scripts file and then go to your ~/.zshrc or ~/.bashrc file which is located in your home directory, and add a line on the bottom that says “SOURCE $HOME/.config/all_scripts.sh” which will make all commands available in your shell. For those who didn’t understand what any of that meant, wait for my upcoming blog on writing your own Zsh/Bash config.
If you already know how your shell works, let’s take it for a spin.
Over time, I have created several aliases and scripts that can not only help address problems 1 through 6 mentioned above, but many more. The only disclaimer is that the configuration I’m going to share with you is not complete as of September 2024. It’s a work in progress and should be ready by the end of December 2024. However, this doesn’t mean it’s not ready to use. You can easily clone my repo, read through the instructions to get started, and build more on top of the existing functionalities that my repo provides.
I would like to point you towards the “pentest” folder that houses scripts that make life easier. Let’s see how they address problems 1 through 6:
- Exporting IP Addresses — The “exip” function allows you to export said ip to the current terminal session so that you can use the $IP variable instead of remembering the IP address of your target all the time.
function exip() {
export IP=$1
echo "Exported IP $1"
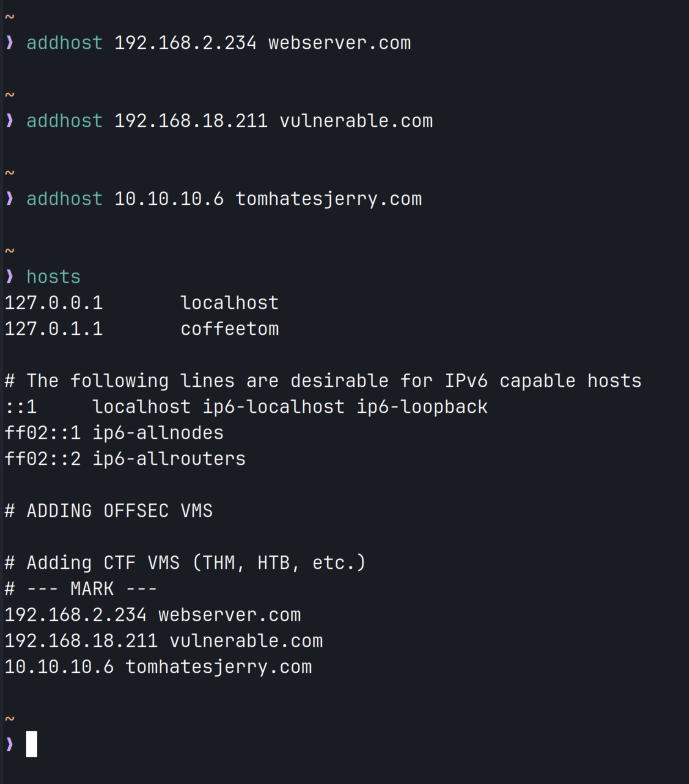
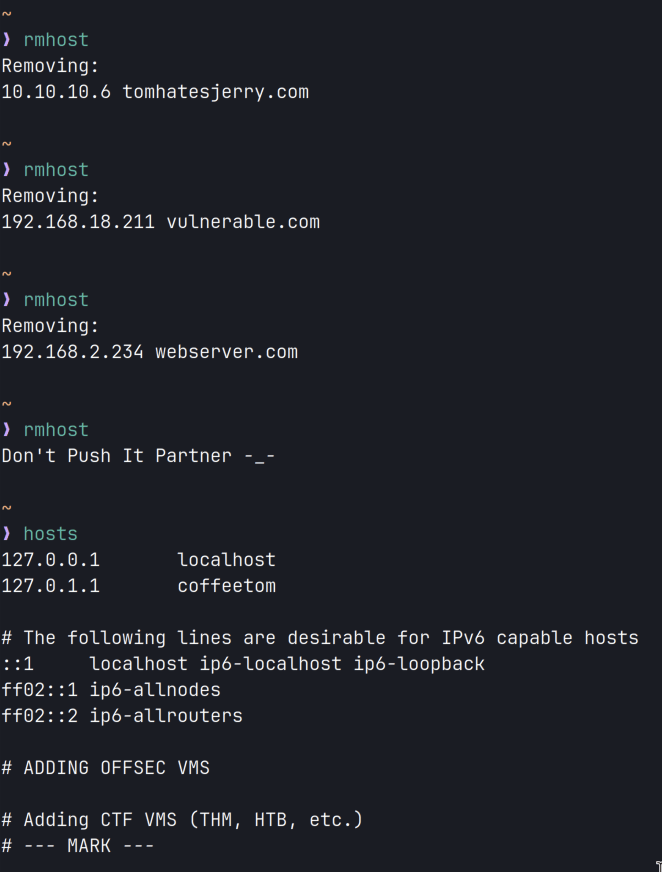
}2. Adding Hosts to /etc/hosts — The “addhost” and “rmhost” commands allow you to add new hostnames and IP addresses to the /etc/hosts file with built-in functionality that will save you from completely emptying out the hosts file when you run “rmhost” multiple times. To set this up, just add the string “### MARK ###” at the end of your current hosts file and the rmhost command will not work if it finds itself removing a line past this checkpoint.
# Setup
# =====
# Before doing anything you need to add the "MARK" keyword
# at the end of your /etc/hosts file so that this script
# can detect it. This will prevent you from running the
# 'rmhost' command through the entire file and causing damage :/

function addhost() {
  ip=$1
  shift
  hostname="$@"
  sudo /bin/zsh -c "echo \"$ip $hostname\" >> /etc/hosts"
}

function rmhost() {
    # Check the last line of the file
    last_line=$(sudo tail -n 1 /etc/hosts)
    mark="MARK"

    # Check if the last line is the protected line
    if [[ "$last_line" =~ "$mark" ]]; then
        echo "Don't Push It Partner -_-"
    else
        # Remove the last line
        sudo /bin/zsh -c "sed -i '\$d' /etc/hosts"
        echo "Removing:"
        echo "$last_line"
    fi
}

# Bonus Alias that prints out the contents of /etc/hosts to the terminal:
alias hosts="cat /etc/hosts"
3. Dealing with VPNs — I have all the VPN files in one folder in the home directory. I have setup bash aliases that call the full command and help me connect to that VPN. I am also working on a bash function that will ask me what VPN I would like to connect to, and then connect to the one I provide the input for. I also have another alias called “vpnip” that shows me the IP address assigned to me once I am connected to VPN. This saves me time that is otherwise taken up by typing out the “ip addr” command and scrolling through the output.
# Connecting to VPNs easily
alias connecthtb="sudo openvpn $HOME/vpns/htb-vip.ovpn"
alias connectpg="sudo openvpn $HOME/vpns/universal.ovpn"

# Bonus Content - Show your public IP & your assigned VPN-IP
alias pubip="host myip.opendns.com resolver1.opendns.com | grep -oE '\b([0-9]{1,3}\.){3}[0-9]{1,3}\b' | awk 'NR==2'"
alias vpnip="ip -4 addr show tun0 | grep -oP \"(?<=inet\s)\d+(\.\d+){3}\""
4. NMAP Scripting Engine — Whenever I forget what nmap script I want to run out of the hundreds of options available, I just run the “nse” command followed by a string like “nse smb-” or “nse http-” (the hyphen is optional). This searches the existence of the string throughout all the scripts NSE provides. Nifty right? I know. Sometimes, I blow my own mind away.
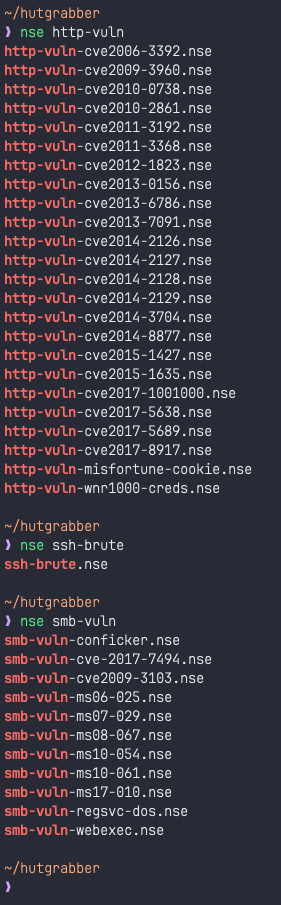
nse() {
  nsedb=$"acarsd-info.nse\naddress-info.nse\nafp-brute.nse\nafp-ls.nse\nafp-path-vuln.nse\nafp-serverinfo.nse\nafp-showmount.nse\najp-auth.nse\najp-brute.nse\najp-headers.nse\najp-methods.nse\najp-request.nse\nallseeingeye-info.nse\namqp-info.nse\nasn-query.nse\nauth-owners.nse\nauth-spoof.nse\nbackorifice-brute.nse\nbackorifice-info.nse\nbacnet-info.nse\nbanner.nse\nbitcoin-getaddr.nse\nbitcoin-info.nse\nbitcoinrpc-info.nse\nbittorrent-discovery.nse\nbjnp-discover.nse\nbroadcast-ataoe-discover.nse\nbroadcast-avahi-dos.nse\nbroadcast-bjnp-discover.nse\nbroadcast-db2-discover.nse\nbroadcast-dhcp-discover.nse\nbroadcast-dhcp6-discover.nse\nbroadcast-dns-service-discovery.nse\nbroadcast-dropbox-listener.nse\nbroadcast-eigrp-discovery.nse\nbroadcast-hid-discoveryd.nse\nbroadcast-igmp-discovery.nse\nbroadcast-jenkins-discover.nse\nbroadcast-listener.nse\nbroadcast-ms-sql-discover.nse\nbroadcast-netbios-master-browser.nse\nbroadcast-networker-discover.nse\nbroadcast-novell-locate.nse\nbroadcast-ospf2-discover.nse\nbroadcast-pc-anywhere.nse\nbroadcast-pc-duo.nse\nbroadcast-pim-discovery.nse\nbroadcast-ping.nse\nbroadcast-pppoe-discover.nse\nbroadcast-rip-discover.nse\nbroadcast-ripng-discover.nse\nbroadcast-sonicwall-discover.nse\nbroadcast-sybase-asa-discover.nse\nbroadcast-tellstick-discover.nse\nbroadcast-upnp-info.nse\nbroadcast-versant-locate.nse\nbroadcast-wake-on-lan.nse\nbroadcast-wpad-discover.nse\nbroadcast-wsdd-discover.nse\nbroadcast-xdmcp-discover.nse\ncassandra-brute.nse\ncassandra-info.nse\ncccam-version.nse\ncics-enum.nse\ncics-info.nse\ncics-user-brute.nse\ncics-user-enum.nse\ncitrix-brute-xml.nse\ncitrix-enum-apps-xml.nse\ncitrix-enum-apps.nse\ncitrix-enum-servers-xml.nse\ncitrix-enum-servers.nse\nclamav-exec.nse\nclock-skew.nse\ncoap-resources.nse\ncouchdb-databases.nse\ncouchdb-stats.nse\ncreds-summary.nse\ncups-info.nse\ncups-queue-info.nse\ncvs-brute-repository.nse\ncvs-brute.nse\ndaap-get-library.nse\ndaytime.nse\ndb2-das-info.nse\ndeluge-rpc-brute.nse\ndhcp-discover.nse\ndicom-brute.nse\ndicom-ping.nse\ndict-info.nse\ndistcc-cve2004-2687.nse\ndns-blacklist.nse\ndns-brute.nse\ndns-cache-snoop.nse\ndns-check-zone.nse\ndns-client-subnet-scan.nse\ndns-fuzz.nse\ndns-ip6-arpa-scan.nse\ndns-nsec-enum.nse\ndns-nsec3-enum.nse\ndns-nsid.nse\ndns-random-srcport.nse\ndns-random-txid.nse\ndns-recursion.nse\ndns-service-discovery.nse\ndns-srv-enum.nse\ndns-update.nse\ndns-zeustracker.nse\ndns-zone-transfer.nse\ndocker-version.nse\ndomcon-brute.nse\ndomcon-cmd.nse\ndomino-enum-users.nse\ndpap-brute.nse\ndrda-brute.nse\ndrda-info.nse\nduplicates.nse\neap-info.nse\nenip-info.nse\nepmd-info.nse\neppc-enum-processes.nse\nfcrdns.nse\nfinger.nse\nfingerprint-strings.nse\nfirewalk.nse\nfirewall-bypass.nse\nflume-master-info.nse\nfox-info.nse\nfreelancer-info.nse\nftp-anon.nse\nftp-bounce.nse\nftp-brute.nse\nftp-libopie.nse\nftp-proftpd-backdoor.nse\nftp-syst.nse\nftp-vsftpd-backdoor.nse\nftp-vuln-cve2010-4221.nse\nganglia-info.nse\ngiop-info.nse\ngkrellm-info.nse\ngopher-ls.nse\ngpsd-info.nse\nhadoop-datanode-info.nse\nhadoop-jobtracker-info.nse\nhadoop-namenode-info.nse\nhadoop-secondary-namenode-info.nse\nhadoop-tasktracker-info.nse\nhbase-master-info.nse\nhbase-region-info.nse\nhddtemp-info.nse\nhnap-info.nse\nhostmap-bfk.nse\nhostmap-crtsh.nse\nhostmap-robtex.nse\nhttp-adobe-coldfusion-apsa1301.nse\nhttp-affiliate-id.nse\[REDACTED FOR SANITY]"

  local search_string="$1"
  if [[ -z "$search_string" ]]; then
    echo "Usage: nse <search_string>"
    return 1
  fi

  echo "$nsedb" | grep -i "$search_string"
}
5. TMUX — If you don’t know what tmux is, you can learn more about it from “typecraft”. Chris is a really cool guy and loves to try out different command line tools. He has his own little series on tmux as well as neovim. I am going to share a few resources down here so that you can learn more. Both tmux and neovim are absolute necessities for me when it comes to penetration testing. I really urge you to explore a little more. My tmux & neovim configs can be found on the “hutgrabber-dots” repo on github.
Introduction to learning TMUX
Playlist - Write your own NeoVim Configuration
6. BackUp Your Toolset — To make sure that you don’t lose all of your tools, store it in the /opt directory and push it to github so that you don’t lose any of them. For me, some of these tools are binaries, some are powershell scripts, some are windows executables.
To get started with Git, you can use my tutorial that goes through all of the steps to get-git-done. See what I did there?
My pentesting toolset can be found in the repo below. Although it is a work in progress, it is very much useable. Expect more changes and housekeeping to take place over the winter…
\ A Strong Recommendation
Learning my way around Vim has really proved to be worth it for me. I agree that Vim has a very steep learning curve, but if you think about it, it’s not that bad. Once you know the ins and outs of Vim, you’ll not only be much faster at writing code, but Vim motions can really feel magical as soon as you get the hang of it. I have some really nice blogs that can help you master Vim in simple and easy steps.


\ Note Taking
If you ‘hold that thought’, it is going to vanish before you can say ‘poof’.

To close things out, I just want to take up a really important, albeit once of the most ‘skipped’ topics of cybersecurity.
“The human brain is really good at generating ideas and really bad at storing them.”
Having your own system of taking, storing & retrieving your notes when you need them is a no brainer. Everyone has a different way of working, however, there are a few ground rules when it comes to making notes. As a penetration tester, you will be making 2 types of personal documents. The first one being your knowledge base; this is where you store your concepts, commands, procedures, etc. that you might need to come back to later on.
The second type of document is your walkthrough. This is your base. The foundation you use to make your official pentest report that an organization can use to better understand their threat posture. The walkthrough is like a ‘voice-note’ to yourself. You are writing everything you are doing and documenting everything that is happening when you’re doing the things you’re doing. I hope that makes sense.
\ The Knowledge Base
Let’s go through some use cases:
- Store information about a tool you’re getting started with and use git-integration to back it up —
- Make a consolidated sheet of commands where you can quickly find a command that you might have forgotten — useful for creating a cheatsheet.
- Create a step-by-step guide of a procedure that you’re not sure you’ll remember after 6 months — really useful for binary exploitation techniques.
By the way, if you can come up with something really good, you can write a blog about it to share it with the community. 😉
Oh! before I forget, learn markdown. It’s a quality of life improvement in my opinion.


Alright. Enough markdown jokes. Moving on…
I like to use Obsidian to take notes and use Notion for writing walkthroughs. Here are some examples that you can use as a base to organize your notes and get started.

\ Walkthroughs
When you start practicing machines on hacking platforms, make sure you also start writing walkthroughs for those machines. Make sections in the walkthrough — “Enumeration”, “Initial Foothold”, “Exploitation”, “PrivEsc”, etc. and then populate those with steps that you took. As a beginner, you might want to be detailed about your steps. Write everything. Not only the things you did, but also the things you thought of, but didn’t end up doing.
Make sure you use git-integration to backup your notes into a private repo on github so that you don’t lose anything. If you’re really adventurous, use “gitbook”.
\ Conclusion
Finally! I know.

I understand that we’ve covered a lot of ground, and while all this might sound overwhelming, I want you to know that mastering the art of penetration testing is a journey, not a destination. We’ve explored the importance of developing a hacker mindset, embracing controlled chaos, and the critical need for organization in your work.
We’ve delved into practical aspects like setting up an efficient terminal environment, leveraging powerful tools like tmux and Vim, and the importance of a robust note-taking system. Remember, these are all pieces of a larger puzzle — your growth as a penetration tester.
And as you dive into your next engagement, just remember:
Why did the hacker break up with their partner?
Because they couldn’t find the right connection!
So grab that coffee, fire up your terminal, and let the exploration begin! The digital world is waiting for your expertise!
Member discussion