
All Things SSH - Part 1

Alright, so this one's pretty interesting! As you might have guessed from the title, this one is going to be a multi-part-series. We will start by covering the basics of SecureShell – setup, keys, configs and more. In the following posts I plan to cover other topics like hardening ssh servers and using ssh as a nifty tool for red teaming.
You will learn about things you never knew the SSH service could do. So subscribe to my newsletter if you haven't yet, and hang tight :)
Let's start by getting the definition out of the way...
SSH (Secure Shell) is a protocol for secure remote login and other secure network services over an insecure network. It consists of three major components: Transport Layer Protocol, User Authentication Protocol, and Connection Protocol.
It's not that bad. Just a simple tool that you'll find hanging on Batman's famous "utility belt" along with other tools like nmap, tcpdump, vim, wireshark, docker, ss & ps. You know, if Batman was a system administrator. He might as well be one – coming out at night and fighting the bad guys; the attributes match up perfectly!

Installing OpenSSH.
The OpenSSH-Client comes pre-installed with most linux systems these days; specially Debian based linux machines. It is important to know that OpenSSH has two different components – openssh-client and the openssh-server. Both of them come with their own set of packages.
OpenSSH-Client comes with – ssh, scp, sftp, ssh-keygen, ssh-add, ssh-keyscan, ssh-copy-id and `ssh-agent. Which are tools that help you work with ssh in an efficient manner. We will discuss some of these tools briefly in a later part of this blog.
OpenSSH-Server usually does not come pre-installed in linux systems. When installed, it comes with – sshd, sftp-server, ssh-keysign, ssh-keygen, scp and sftp. Which are tools that help you administer an ssh server efficiently.
To install both of these on a linux system, simply update your package manager and install your tools. For Debian systems you can install ssh using apt.
# Update your repository
sudo apt update && sudo apt upgrade -y

#Install packages
sudo apt install openssh-client openssh-server -y
SSH Client - Key Features & Setup.
When you connect to an ssh server, it enables you to run commands on the system remotely as if you are directly interfacing with the system yourself. The ssh command uses a basic syntax of ssh username@hostname for you to be able to initiate an ssh connection with the remote server/system. I think that most people know this part. You initiate the connection, enter the password, and voila! You’re in.
In each user's /home directory, ssh creates a hidden sub-directory called .ssh where it stores keys, configurations & trusted hosts for that specific user. To maintain a secure/encrypted connection when talking to a server, ssh uses its own protocol which is separate from TLS. However, it uses public key cryptography to identify various servers' identities as well as securely authenticate to them.
Setting Up Password-less Authentication
Using passwords to login to an ssh session can make a server prone to a bruteforce attacks. Most modern architectures use keys instead of passwords to authenticate clients to ssh servers. We cover this topic briefly in our Git & GitHub blogpost where we setup git for the first time & authenticate to GitHub using ssh.
In order to generate a new key, use the ssh-keygen tool that comes with the OpenSSH suite of tools. Follow the on-screen prompts that follow create your key. To make sure your key gets saved to the $HOME/.ssh/ directory, provide the absolute path while naming the key.
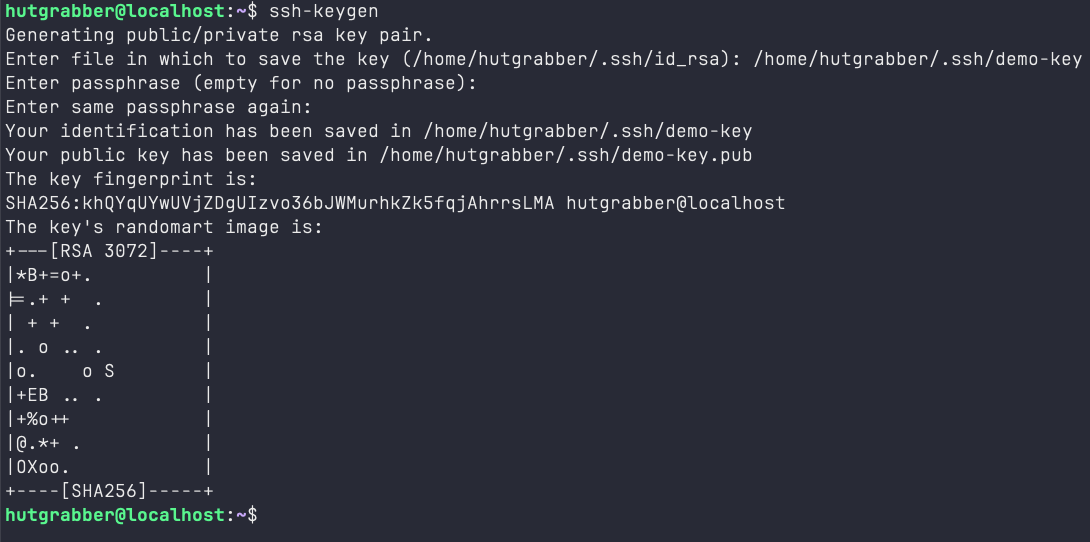
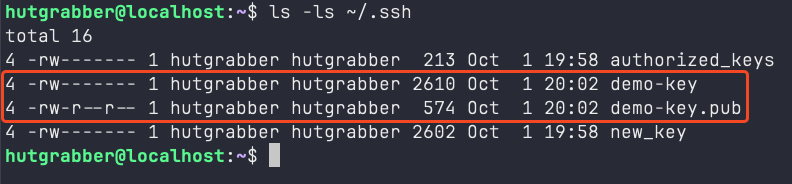
This command creates a key-pair with a public and a private key inside the $HOME/.ssh directory of the current user. In this case we have the demo-key as well as the demo-key.pub in the .ssh directory.
Once we have the key-pair, we can use this to authenticate to any ssh server. To do this, you can provide an input file along with your ssh command like so:
ssh -i ~/.ssh/demo-key user@hostname
However, this will not work until the server you are connecting to knows who you are; and for it to know who you are, you will need to provide the corresponding public key to the server prior to making this connection. In this case - $HOME/.ssh/demo-key.pub. We can use the ssh-copy-id command to provide this key-file to the ssh server we are trying to connect to.
ssh-copy-id ~/.ssh/demo-key.pub user@hostname
Once the server knows who you are, you will not be prompted for a password. Just make sure that the permissions of the key-files are no more than600 and 644 respectively for the private and public key-files. Which means that they are only readable/writeable by the owner of the file and no one else.
Success!
Customizing Your Experience
The $HOME/.ssh/config file is a great tool to leverage to optimize your ssh workflow. You can add a list of hosts with a bunch of options that tell ssh how to connect to that host. The basic syntax of the ssh config file is this –
Host hostname
    Option1 value1
    Option2 value2

Host anotherhostname
    Option3 value3
    Option4 value4

# star (*) represents 'all other hosts'
Host *
    Option5 value5
This means that if I am tired of typing this command every time I connect to my Network Attached Storage (NAS) –
ssh -i ~/.ssh/naskey -p 55655 hutgrabber_nas@192.168.233.100
I can just create an ssh config file (~/.ssh/config), open it in vim (which is the best & my favorite) and type the following –
Host HomeNas
  Port 55655
  User hutgrabber_nas
  IdentityFile $HOME/.ssh/naskey
This reduces the command above to this –
ssh HomeNas
You don't even have to type HomeNas all the way. It also comes with tab-completion. I know! #LifeChanged.
So, what else can you do with the ssh config file? Remember the other github blogpost? We did something along these lines –
Host github.com
  AddKeysToAgent yes
  UseKeyChain yes # for macos
  IdentityFile $HOME/.ssh/key_name # private key
What do all these options do? Well that's your homework for today. You can run the man ssh_config command on your linux terminal to get a huge list of everything you can do with this file. Spoiler alert!! It's very powerful.
If you are a Windows user, my condolences. You can click here for the man page.
Hot Take:
— Sparsh (@hutgrabber) September 14, 2024
I love PowerShell. PowerShell is the best.
SSH Server - Key Features & Setup.
Let's talk about the server side of things now. When you install the OpenSSH-Server, the ssh-daemon gets installed as well. This is a POSIX compliant service that can be controlled using systemd. It opens port 22 on your system and listens for incoming ssh connections. To stop, start, reload & restart the ssh-server you can use systemd as shown –
sudo systemctl status sshd

sudo systemctl start sshd
sudo systemctl stop sshd

sudo systemctl restart sshd
sudo systemctl reload sshd
Basic Concepts
Let's get a few things out of the way before we start playing with the ssh-server.
- Authorized Keys File – This file is stored in the home directory of every user and stores the public keys of different clients. This only allows incoming connections from systems that have the corresponding private-keys for the public-keys stored in the
~/.ssh/authorized_keysfile. - Known Hosts File – Located in a user's home directory under
~/.ssh, this file stores the public keys of all hosts that an ssh-client has previously connected to. This is important to prevent a man-in-the-middle attack. Hosts are auto-magically added to this file when a client connects to a new ssh-server for the first time. - Copy ID Command – The
ssh-copy-idcommand is a nifty tool that ssh-clients can use, to get their public keys straight into theauthorized_keysfile of the home directory of the user they are trying to connect as on the ssh-server. This way they don't have to manually ssh into a server and copy and paste their public key by opening theauthorized_keysfile in a text editor –
ssh-copy-id -i ~/.ssh/demo-key.pub user@hostname
- SSH-Server Config File – The
/etc/ssh/sshd_configfile is where you can configure your ssh server to behave the way you want. There are a number of different settings that you can choose from. To make things easy, the most common settings are pre-typed & commented with instructions on how to use them. - Key Scan Utility – This is a lesser known utility that ssh provides, but can be really important for system administrators. The
ssh-keyscancommand can be used to gather the public keys of multiple hosts on a network. To use keyscan the following command can be used –ssh-keyscan host1 host2 host3 host4. This will print the keys of the hosts in theknown_hostsfile format. As a security professional this can be very useful in case you do not have access to nmap. It can also be used as a shortcut to add multiple systems to yourknown_hostsfile. - Miscellaneous – There are some other files that you should also take a look at which are a part of the SSH configuration file system –
/etc/ssh_hostkey&/etc/ssh_hostkey.pub. Which are your server's public and private keys to verify your server's identity on a network. Feel free to explore the/etc/sshdirectory to check out other neat things that you can do with ssh.
Resources.
This is a great video by LearnLinuxTV that gives you a hands on tutorial about SSH from start to finish:
SSH-ell Yeah! We did it.
We talked about the ssh-client, the ssh-server and how they work under the hood. We also saw ways in which we can configure them to make them tick. We will be coming out with more content about securing SSH servers as well as using SSH as a tool for penetration testing. For keeping up with all our content, please subscribe to the newsletter and if you already have, you're awesome!
Member discussion